Monday, September 04, 2006
Virtually Complete!!
Woo Hoo! FINALLY! After MUCH frustration with wiring the lights, I got it done today! Many thanks go to the bro and homies at Buggies Unlimited Forums for their help and to the wife for confidence building. It took 3.5 hours today, but it felt fantastic to hit those switches and see those headlights glow!
Look at those glowin' eyes!

I spent a total of 6 hours on the cart today. First was wiring the headlights, tail lights, and brake/turn signals. I had mounted the headlights using scrap "material"(don't ask - but it looks ok), and had most of the wires pre-strung under the cart, so the time was spent checkin' and double checkin' my schematic and crimping buttjoiners and splices. I mounted 2 switches. The first sends power to the signal/brake lights and to the head/tail light switch. This allows me to turn off the brake lights when I have to park it using the brake so those lights won't stay on. However, the brake lights don't function at this point. I believe this is a pedal switch issue as I am confident everything is wired correctly. Also, the signals do not blink. I have JUST learned that the LED lights do not draw enough power to trigger the blinker relay - wish someone would have mentioned that BEFORE! So those will need to be replaced. Also, the LEDs are not bright enough to use as signal and brake lights during the day, though they show up great in the dark. DESPITE these issues I am ECSTATIC! All the lights come on and the rocker/toggle switches work perfectly.
I replaced the EZGO badge - having painted it black, where it was red before. It looks like crap upclose, but still looks better than the red. (see the before pics)
THEN I proceeded to bust out the painters tape, newspaper and a rattle can of white gloss auto paint. I added redneck racing stripes! I did sand the green coat to give the white something to grip. The cracked layer is still very visible up close, but from a short distance the cart looks great. Which is really all I was going for. It really is a 'CretinCart. It looks pretty good with the university logo magnets too. I still want to add black pinstripes on the white edges. That will really make it stand out.
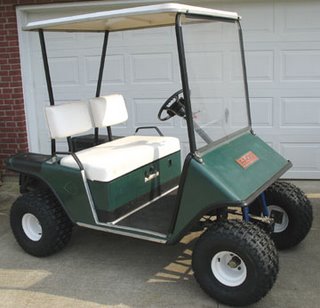
Schweet!
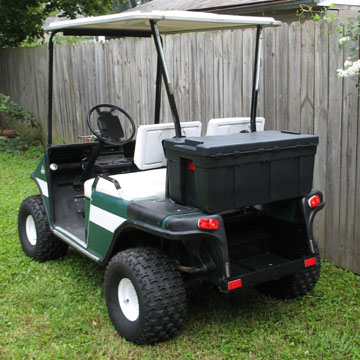
I have also added a trunk to the cart. I mounted it "backwards" (it opens towards the front) so it could be pushed flush against the top uprights and still open easily. Figured it didn't really matter how it opened. I used a short cord to hold it up when it's open, so the top doesn't flop and break. Slapped a few stickyback reflectors on it, just one more thing to make the cart visible to those I don't trust (as in every other driver on the road).
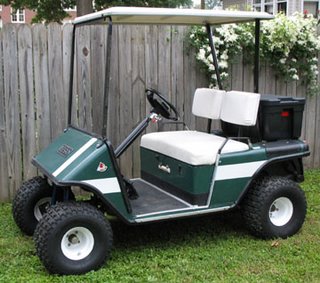
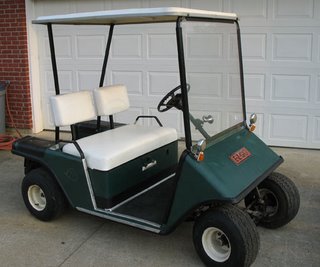
CretinCart's gotta a big ole butt, oh yeah.

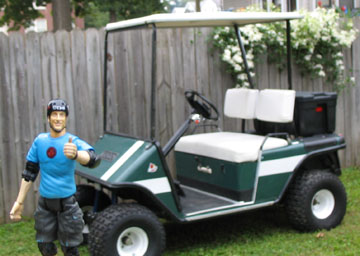
LT is ready to roll!
One Kewl Cart

I'm still waiting on a 4ga wire set to be created, but that will be a quick and easy install once I got 'em.
So - there will not be much to report here for awhile, and then once the brake light issue is resolved, and the 4ga wires are in, Cart blog updates will be few and far between. You'll have to email me if ya gotta question regardin' the 'CretinCart.
Look at those glowin' eyes!

I spent a total of 6 hours on the cart today. First was wiring the headlights, tail lights, and brake/turn signals. I had mounted the headlights using scrap "material"(don't ask - but it looks ok), and had most of the wires pre-strung under the cart, so the time was spent checkin' and double checkin' my schematic and crimping buttjoiners and splices. I mounted 2 switches. The first sends power to the signal/brake lights and to the head/tail light switch. This allows me to turn off the brake lights when I have to park it using the brake so those lights won't stay on. However, the brake lights don't function at this point. I believe this is a pedal switch issue as I am confident everything is wired correctly. Also, the signals do not blink. I have JUST learned that the LED lights do not draw enough power to trigger the blinker relay - wish someone would have mentioned that BEFORE! So those will need to be replaced. Also, the LEDs are not bright enough to use as signal and brake lights during the day, though they show up great in the dark. DESPITE these issues I am ECSTATIC! All the lights come on and the rocker/toggle switches work perfectly.
I replaced the EZGO badge - having painted it black, where it was red before. It looks like crap upclose, but still looks better than the red. (see the before pics)
THEN I proceeded to bust out the painters tape, newspaper and a rattle can of white gloss auto paint. I added redneck racing stripes! I did sand the green coat to give the white something to grip. The cracked layer is still very visible up close, but from a short distance the cart looks great. Which is really all I was going for. It really is a 'CretinCart. It looks pretty good with the university logo magnets too. I still want to add black pinstripes on the white edges. That will really make it stand out.
Schweet!

I have also added a trunk to the cart. I mounted it "backwards" (it opens towards the front) so it could be pushed flush against the top uprights and still open easily. Figured it didn't really matter how it opened. I used a short cord to hold it up when it's open, so the top doesn't flop and break. Slapped a few stickyback reflectors on it, just one more thing to make the cart visible to those I don't trust (as in every other driver on the road).
CretinCart's gotta a big ole butt, oh yeah.
LT is ready to roll!

One Kewl Cart
I'm still waiting on a 4ga wire set to be created, but that will be a quick and easy install once I got 'em.
So - there will not be much to report here for awhile, and then once the brake light issue is resolved, and the 4ga wires are in, Cart blog updates will be few and far between. You'll have to email me if ya gotta question regardin' the 'CretinCart.
Wednesday, July 05, 2006
It continues...
The CretinCart is home now... but tucked away in the backyard, as it is still incomplete. I've been evicted from the bro's garage as he is collecting supplies and old lumber for a playhouse for the girls... Not much new really to report. It's been a couple of weeks of cart (and wife) neglect for skate-realted things... But here's what we did yesterday...
Had to take the big back tires off - it wouldn't fit on the trailer otherwise - so now it looks really stupid with stock tires on the back, and mudbusters on the front. I got all of the "pre-wiring" done for the lights. I was stoked to find EXACTLY the kind of light I was looking for at WallyWorld (12" long LED light bar- for $10) that I will use as brake and signal lights. However, there was only one on the shelf, and it had been opened and obviously returned... I bought it anyway, to confer w/bro to make sure it would work. He said it will, he has a wiring plan... These lights will go on the uprights for the top, so they will be visible. I'm still a bit skeptical... but I think they will be "good enough."
We cracked the front of the trailer (wood) loading the darn thing. Oh well, I'm sure there will be left overs from the playhouse to fix this. THEN, just a few miles away, we here a snap... my (other) bro says he saw something hit the ground but he didn't know what... Any guesses? We pull over, and everything looks just fine. I get back in, look in the rearview mirror and realize... The WINDSHIELD of the cart is gone! DAMMIT! DUH! (No problems with it before BUT it was on loaded backwards this time... it popped out with ease.) We went back for it and it is actually intact, but scratched to hell. Made it more aerodynamic for the rest of the 40 mile trip though, right?
Also, bro's "diamond plate" guy at work broke his hand last week, so that custom front cover idea is gone, at least for a couple of months. For now I will attach the "fog" headlights I bought to the old plastic cowling. But I am considering going with a "woody" look instead, as I have a woodshop at my disposal, and with the cart being green, it might look kinda cool. Particularly if I decide to sell it. Initial brainstorm(fart) includes custom cowling, frame around the EZGO plate, and some sort of side panels (need something to cover the cracked paint here). Of course there would be tons of polyurethane used to coat said wood accents...
But bro is also entertaining thoughts of putting in a shaft driven quad motor... I don't know about all that... That goes far far beyond my mechanical build and maintenance comfort level, and I crossed that line along time ago - about the time I clicked "submit bid" on eBay that started this project.
So to those of you watching this creation with similar carts, I have nothing new to offer. Sorry. Once I get back to WallyWorld and get all the lights I plan to use, and then get them mounted and wired as far as I can, I will take some pics. (I will not attempt the final wiring - and bro is playing army next week with the Guard.) But hopefully only 10 minute job for him if I get MY part done. It still runs ok, kinda slow. Stuggles a bit with hills, but doesn't quit. AND the brakes are still $#i+... REALLY gotta get that fixed. So at this rate, it should be ready to drive to work just in time for the first freeze of the season... I should stick with skateboards.
Friday, June 16, 2006
It stirs...
As I suspected... got the bolt WELDED back into position, motor reassembled, reinstalled... and wa la! The ConcretinCart is ALIVE! Ok, so maybe just "alive." It is still painfully slow. So I'm somewhat disappointed with the field coil upgrade. BUT I am optimistic as the batteries probably don't have a full charge, they've been sittin' awhile, and I don't have the new 4G wiring. I'm also hoping that once the lights, stickers, diamond plate and a good thorough scrubbin are all complete, that it'll look good enough to still bust it out every morning. (The cool factor's gotta be there or it's gotta go MUCH faster. And I don't have the funds for faster.)
But it runs! And there is a good amount of coolness with the lift and tires. It did not like my bros hilly street at all... barely made it up, felt like a power issue... so perhaps the 48V option is the next step? We'll see how I feel about it after it's truly complete. But mechanically I feel pretty good. I tore it down, and put it back together and it still runs. So at least I didn't make it any worse.
But it runs! And there is a good amount of coolness with the lift and tires. It did not like my bros hilly street at all... barely made it up, felt like a power issue... so perhaps the 48V option is the next step? We'll see how I feel about it after it's truly complete. But mechanically I feel pretty good. I tore it down, and put it back together and it still runs. So at least I didn't make it any worse.
Tuesday, June 13, 2006
Almost runnin'... Grrrr...
The Brothers Three all spent the day in a garage working on various projects from wiring lights on a trailer, tweaking a mower, firing up a waverunner, testing a quad, and piecing together the ConcretinCart.
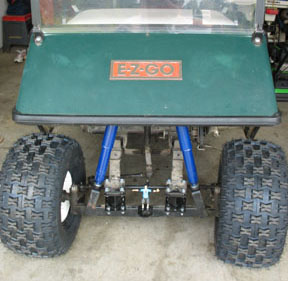
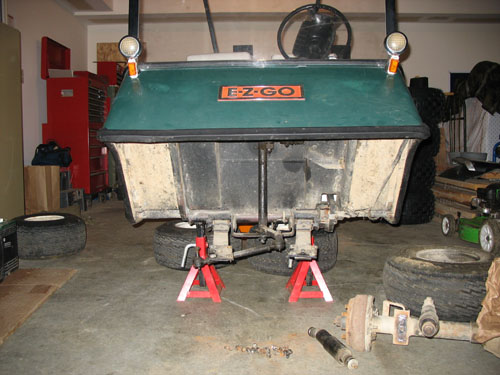
BEFORE the lift...
and AFTER... I like it!
Got the front shocks on, no problem. Finally ended up getting the longer ones at Napa... should have started there. The rear shocks however... no MAJOR problems but they are much fatter than the stock ones, SO... they don't really fit width wise... they are right up against the lift risers, so we lightly hammered the top cover on the shock to give it a flat spot that would fit JUST barely. But I don't think it would have mattered really, cause the shocks are stiff, and I don't expect them to ever compress enough to hit. I probably could have put in 2x4s and got the same ride! (I was warned about this already, and I did expect the stiff ride.)


Cleaned up a bit and "rustoleumed" the battery rails.
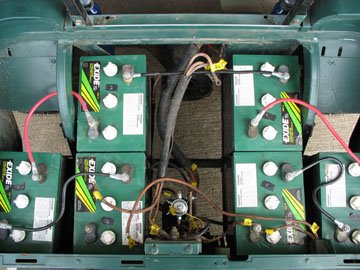
Bro got the brakes adjusted, and the new "movable contact" installed. He already had the motor in and the rear tires on. SO, finally started puttin' in batteries and hooking shtuff up, going by my pre tear down labeling... (We used the old wiring, as the new ones aren't in yet.) Got all psyched up, put the seat on, shift in fwd, put the key in, "ready?" Pedal.... nothin'... hmmm... pedal again... key check, FnR check, pedal... NADA...
shoulder drop... dammit...
Double checked all the labels and wiring... correct... Bro busted out the meter and solenoid wasn't doing anything... tried to convince me that my wiring was wrong, but I was 99% sure I labeled it right, and 100% sure I hooked them up as labeled. Got the solenoid to click (movin' wires around) Then he has a revelation... I bet it's that bolt I broke... I bet the solder didn't hold... *sigh* undid the wires, took out the motor and I'll be... bolt was separated from the field coil (again). SO, he's gonna have it welded back on. I'm pretty confident once that's fixed, it'll run.

Notice anything missing above?

SO... still not running yet, and even if it were, don't have lights or new wiring, or seat belt... so still wouldn't be ready for the street. But dammit I really wanted to see(and share) the results of the field coil upgrade... OH WELL! Sorry folks. Maybe next week.

BEFORE the lift...

and AFTER... I like it!
Got the front shocks on, no problem. Finally ended up getting the longer ones at Napa... should have started there. The rear shocks however... no MAJOR problems but they are much fatter than the stock ones, SO... they don't really fit width wise... they are right up against the lift risers, so we lightly hammered the top cover on the shock to give it a flat spot that would fit JUST barely. But I don't think it would have mattered really, cause the shocks are stiff, and I don't expect them to ever compress enough to hit. I probably could have put in 2x4s and got the same ride! (I was warned about this already, and I did expect the stiff ride.)


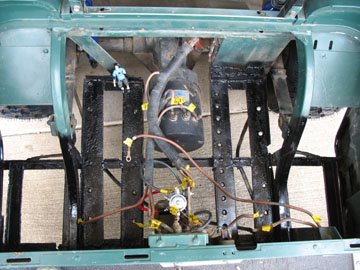
Cleaned up a bit and "rustoleumed" the battery rails.
Bro got the brakes adjusted, and the new "movable contact" installed. He already had the motor in and the rear tires on. SO, finally started puttin' in batteries and hooking shtuff up, going by my pre tear down labeling... (We used the old wiring, as the new ones aren't in yet.) Got all psyched up, put the seat on, shift in fwd, put the key in, "ready?" Pedal.... nothin'... hmmm... pedal again... key check, FnR check, pedal... NADA...
shoulder drop... dammit...
Double checked all the labels and wiring... correct... Bro busted out the meter and solenoid wasn't doing anything... tried to convince me that my wiring was wrong, but I was 99% sure I labeled it right, and 100% sure I hooked them up as labeled. Got the solenoid to click (movin' wires around) Then he has a revelation... I bet it's that bolt I broke... I bet the solder didn't hold... *sigh* undid the wires, took out the motor and I'll be... bolt was separated from the field coil (again). SO, he's gonna have it welded back on. I'm pretty confident once that's fixed, it'll run.
Notice anything missing above?

SO... still not running yet, and even if it were, don't have lights or new wiring, or seat belt... so still wouldn't be ready for the street. But dammit I really wanted to see(and share) the results of the field coil upgrade... OH WELL! Sorry folks. Maybe next week.
Saturday, June 03, 2006
Lack of Productivity...
The full steam ahead idea is no more. Friday didn't go nearly as smooth as the first two days of work. We installed the lift kit on the back, and then removed the bolts, and installed the ubolts (as instructed). Duh. And we only noticed that because the bolts weren't long enough to reach the lock part of the lock nuts... the ubolts didn't quite fit the rear plates so they took a bit o' pounding, but we got 'em on. The front lift was already on when I arrived, bro and 7 yr old niece did that... excellent! The wheels don't look as insane when mounted on the cart, they look cool. Also noticed that the brakes ARE gonna be a problem, hopefully just new shoes as originally expected (but hoped it was just gonna be a cable thing). Mo' money...
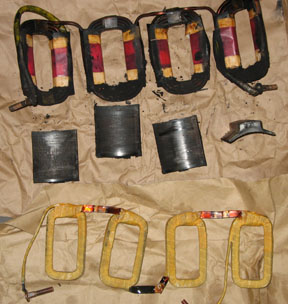
I did end up taking off the other end of the motor housing, as my bro pointed out the brushes wouldn't go back into position if we didn't do that first. We got the new field coil in without incident, BUT he broke off a bolt from the end when reassembling the motor... grrrr... It's an easy fix for him at the "office" (a military motorpool) but still, I was hoping to get the motor back in already. (One bit o' good news is he does have some scrap diamond plate and I'll have one killer front end when we're done.)
THEN... as I decided to wuss out and go the wimpy route and just replace the copper contacts on the old speed board, I really fought with the new one to relinquish them... actually got three of them on, and then the "movable contact" just came off in my hand as I moved it to insert the last 2... grrrr... Which means I must replace it, (it was apparently about to fall off anyhow), which means I now HAVE TO remove the accelerator pedal linkage I was trying to avoid dismantling!! (make sense?) Sunuva... If I'd known that, I would have just replaced the whole speed board... duh (again). Removed the old solenoid as well, but of course the bolts were too short for the new one so the new one isn't in... I don't mind the lil' things... but lots of lil' things went askew.
But the bro is on vacation with the girls the next few weeks, and I have a sneaky suspicion that will translate into some things being done already when I arrive to work on it. (There is absolutley NO WAY I would have been able to do all of this on my own as I had originally thought and actually planned. So I guess the thieves kinda did my a favor, still wish they hadn't though.) Gotta get the bro a cool "attaboy" gift when this project is over...
So, note to those with old carts watching my progress (or lack there of)...
Check E V E R Y T H I N G before you begin, constantly during, and check again after! Even the smallest thing will set you back a few hours or even days (with parts ordering), and really mess with your head and enthusiasm. Even my ScopioticNeurosis couldn't prevent oversights... Until the next build day...
Thursday, June 01, 2006
Productivity
Didn't have much time to work on it last night... but apparently, with big brother help, I didn't need much. In just under 2 hours we had the wheels off, complete front end suspension disassembled, and the rear axle dismounted, shocks and all. I certainly couldn't have done that on my own in 4+ hours. I would have ended up cutting the shocks off the back as it took both of us really cranking on them to get them removed. We debated on fabricating and welding new shock mounts on the front, but finally decided to just get longer shocks and not fuss with it. (Or make extra work for anyone else, as we weren't gonna do it.) He'll have the shock mount straightened out Thursday, and check out the scraps of diamond plate for a new front cover... But we'll wait to determine this shape and size after we settle on a headlight configuration. Man, this is gonna be fun. I spent another hour at home cleaning up the motor. I'll have to get new nuts for the field coil as the end bolts are bigger than the original (and one was stripped anyway). That and shocks will be my challenge for Thursday afternoon.
And no matter how much the big bro shakes his head at me in that "you're such a dork lil' brother" fashion, I think he's gonna like it too. Particularly when he's riding around with his daughters.
FrontEnd Dismantled

RearEnd Dismantled

Out with the old, in with the new... field coils
And no matter how much the big bro shakes his head at me in that "you're such a dork lil' brother" fashion, I think he's gonna like it too. Particularly when he's riding around with his daughters.
FrontEnd Dismantled
RearEnd Dismantled

Out with the old, in with the new... field coils

Tuesday, May 30, 2006
Buzz Kill...
Obviously stoked on the progress of the cart I was ready for another productive jam session on the build. But it was not to be... My friend called Sunday morning to say her garage was broken into and all of my tools were gone! MuthaFugger! I'm sure Karma will see to it that the punk thieves get a proper beatdown, but I do kinda wish I could be at least a spectator to said deserved beating. But as Jason Lee has taught the nation (with the help of NBC), we don't get to decide when Karma dishes out that which is deserved/earned. It's like any other religion, you just gotta have faith. And unfortunately, rarely are random acts of Karma as funny as they are with Earl.
Luckily none of the cart parts (nor the big wheels) were disturbed - the thieves must have watched me work in that garage all day, and knew exactly where the tools were. I am surprised they didn't go for the wheels. Too late now you loser! I spent the day removing everything, and I'll be transferring it to my bros house 45 minutes away. He has tons o' tools so I can continue the build. It will set me back at least a week though. Just sucks having to travel to work on it. But he's anxious to help out and he can certainly help me make sure certain things are done right, particularly the light wiring.
So... Determined to still get something accomplished, I took apart the motor in my basement. The old field coil reluctantly released its hold on the housing, and tonight I'll try to clean out the motor and then install the new coil. I think the majority of everything will get done this weekend, but I'll still have brake issues to solve, and new lights to purchase and install.
Updated: May 31 - See comment to this post for a good helping of Karma - didn't want to get too far off topic of the cart blog, but figured since I brought it up, it deserved a follow-up when it presented itself. And it did.
![]()